Skip to content

If you’re looking for a dinner that packs incredible flavor without keeping you chained to the stove, you’ve come to the right place! Today, we are diving into my absolute favorite quick weeknight meal: Vietnamese ginger chicken. I’m Anna, and I’m just a passionate food lover who believes cooking should be joyful, not stressful. That’s why I focus on simple, flavorful chicken recipes that make your everyday cooking easier.
This recipe has been tested dozens of times in my own kitchen—I’ve tweaked the fish sauce and sugar ratio until it’s just right. You get that beautiful, cozy caramelized chicken with lemongrass in under 40 minutes, seriously! It’s the kind of dish that tastes like it took hours of simmering, but we’re using smart techniques to get that depth of flavor fast. Trust me, once you nail this balance, you’ll be making this Vietnamese ginger chicken all the time.

Table Of content
Essential Components for Vietnamese Ginger Chicken
You can’t rush flavor, even in a 35-minute meal! The magic in this skillet comes down to balancing five core elements: the richness of the chicken, the bright zing of the aromatics, the depth of the fish sauce, the sweetness of the caramel, and a touch of acid. I always insist on using chicken thighs here; they hold up so much better to the high heat caramelization than breasts do. Don’t skimp on the fresh ginger and lemongrass either—that’s where the signature fragrance really comes from.
Getting these ratios right is key to making this dish taste authentic. If your sauce tastes flat, it usually means you need more fish sauce or a splash more vinegar. It’s all about tasting as you go!
Measuring Ingredients for Flavor Balance
Because the sauce relies on such precise balance between salty, sweet, and sour, measuring accurately for the first few attempts is really important. Once you get a feel for it, you can start eyeballing, but for now, let’s stick to the recipe card. I’ve laid out everything you need below so you can gather your components before you even turn on the stove. This is called mise en place, and it saves so much stress! Check out my Pinterest board for more quick meal ideas!
| Ingredient Category | Item | Amount (Yield: 4 Servings) | Purpose |
|---|---|---|---|
| Protein | Boneless Skinless Chicken Thighs | 1 \u00bd pounds | Richness and tender texture |
| Aromatics | Fresh Lemongrass (minced) | 3 stalks (white parts only) | Bright, citrusy base flavor |
| Aromatics | Fresh Ginger (matchsticks) | 3-inch piece | Warmth and spice |
| Sauce Base | Light Brown Sugar (packed) | 3 tablespoons | Caramelization and sweetness |
| Sauce Base | Fish Sauce | 3 tablespoons | Salty, umami depth |
| Acidity | Rice Vinegar | 1 teaspoon | Cutting through the richness |
Necessary Equipment for Your Vietnamese Ginger Chicken
Since we are making this dinner entirely in one pan, you don’t need a kitchen full of gadgets, which is why I love it for busy nights! You absolutely need a large, heavy-bottomed skillet—cast iron is great, but stainless steel works too. Make sure it’s big enough to sear the chicken in a single layer so it browns instead of steams. You’ll also need a good sharp knife for mincing all those wonderful aromatics. Having a cutting board ready is key for our prep work!
- Large, heavy-bottomed skillet (10-12 inches recommended)
- Sharp chef’s knife
- Cutting board
- Tongs or a wooden spoon for stirring
- Thermometer (for checking chicken safety!)
Step-by-Step Guide to Perfect Vietnamese Ginger Chicken
Okay, now for the fun part! This is where everything comes together quickly, so make sure you have all your chopped ingredients sitting right next to your stove—you won’t have time to stop and chop once the heat is on. Follow these steps exactly, and you’ll have that irresistible, sticky, fragrant dinner ready in no time.
Prepping the Chicken and Aromatics
First things first, we need to prep the chicken thighs. Pat every piece really dry with paper towels; moisture is the enemy of good browning! Once dry, toss them in a bowl with the salt, pepper, and cornstarch. That little bit of cornstarch is a secret weapon—it helps create a light crust when searing and thickens the sauce later on, so make sure every piece is coated. Heat one tablespoon of oil in your large skillet over medium-high heat. Work in batches, I beg you! If you overcrowd the pan, the chicken will steam instead of sear, and we want gorgeous browning here. Cook the chicken for about 3 to 4 minutes per side until it’s just nicely colored but not cooked all the way through. Transfer that gorgeous chicken onto a clean plate and set it aside.
Now, turn the heat down slightly to medium. Add that second tablespoon of oil to the empty pan. Toss in your minced lemongrass—remember, only the white, tender parts! Sauté that for about 2 to 3 minutes until you can really smell that bright, citrusy aroma filling your kitchen. This step is crucial for building the base layer of flavor!
Building the Caramelized Sauce Base
Once the lemongrass smells amazing, toss in your thin matchsticks of ginger, the minced garlic, the shallot, and your sliced chili (if you’re using it). Stir everything constantly for about 1 to 2 minutes. You want these aromatics to become fragrant and just start turning golden around the edges, but be careful not to burn that garlic—burnt garlic tastes bitter, and we don’t want that! Now for the magic trick: sprinkle that packed light brown sugar evenly right over those sizzling aromatics. Add your ¼ cup of water, and let it bubble away for 2 to 3 minutes, stirring gently. Watch closely! The sugar will dissolve, and the mixture should start turning a deep, rich amber color. That’s your caramel base forming!

Simmering and Finishing the Vietnamese Ginger Chicken
Once the caramel is perfect, stir in your fish sauce, soy sauce, and rice vinegar. Give that a quick swirl, and then bring that seared chicken—and any juices that collected on the plate—right back into the pan. Turn the heat down to medium-low now. We need to simmer this gently for about 8 to 10 minutes, stirring every couple of minutes to make sure everything gets coated in that glossy sauce. Keep checking that internal temperature! You must make sure the chicken reaches a safe 165°F (74°C) to be done. When it hits that temperature, the sauce should be thick and clinging beautifully to the chicken. When you turn the heat off, fold in most of your fresh green onions and cilantro. Give it one last taste test—maybe it needs just one more tiny splash of fish sauce for saltiness, or a splash of water if it’s too thick!
Tips for Achieving Restaurant-Quality Vietnamese Ginger Chicken
It’s those little details that separate a good home-cooked meal from something you’d happily pay for at a restaurant, right? When I first started making this, I had a few sticky situations with the sauce or dry chicken, but after testing this recipe endlessly, I’ve got the foolproof tricks down. The key is respecting the process, especially the searing and the caramelizing. Don’t rush the browning stages; that color equals deep flavor, which we can’t get from just simmering everything at once.
Also, always use the liquid ingredients listed, especially the fish sauce and vinegar, at the very end. You don’t want the vinegar evaporating too early when you’re trying to build the caramel. A little patience during the simmer phase ensures that the chicken absorbs all that amazing flavor without drying out. For more inspiration on quick, flavorful meals, check out my delicious one-pan dinner ideas.
Selecting the Right Chicken Cut
I cannot stress this enough: use the boneless, skinless chicken thighs! Chicken breast is leaner, and when you sear it quickly and then simmer it for 10 minutes, it tends to dry out and get stringy. Thigh meat has a little more fat content, which keeps it incredibly moist and tender, even after it hits that 165°F safety mark. Plus, the thighs caramelize beautifully on the outside, giving you that perfect textural contrast.
Managing the Chili Heat Level
That little bit of red chili adds such a wonderful warmth to the background, but we all have different spice tolerances! If you want the flavor of the chili without the fire, the trick is all in the seeds. When you slice your chili, if you see those white ribs and seeds, scoop them all out before slicing the red flesh thinly. That’s where most of the capsaicin lives. If you like it really spicy, leave half the seeds in, but for a cozy dinner, seeds out is the way to go!
Serving and Storing Your Flavorful Vietnamese Ginger Chicken
Once you’ve mastered making this incredibly fragrant Vietnamese ginger chicken, you’ll want to know how to show it off and how to save it for lunch the next day. Trust me, the leftovers are almost better because the sauce has more time to soak into the chicken overnight!
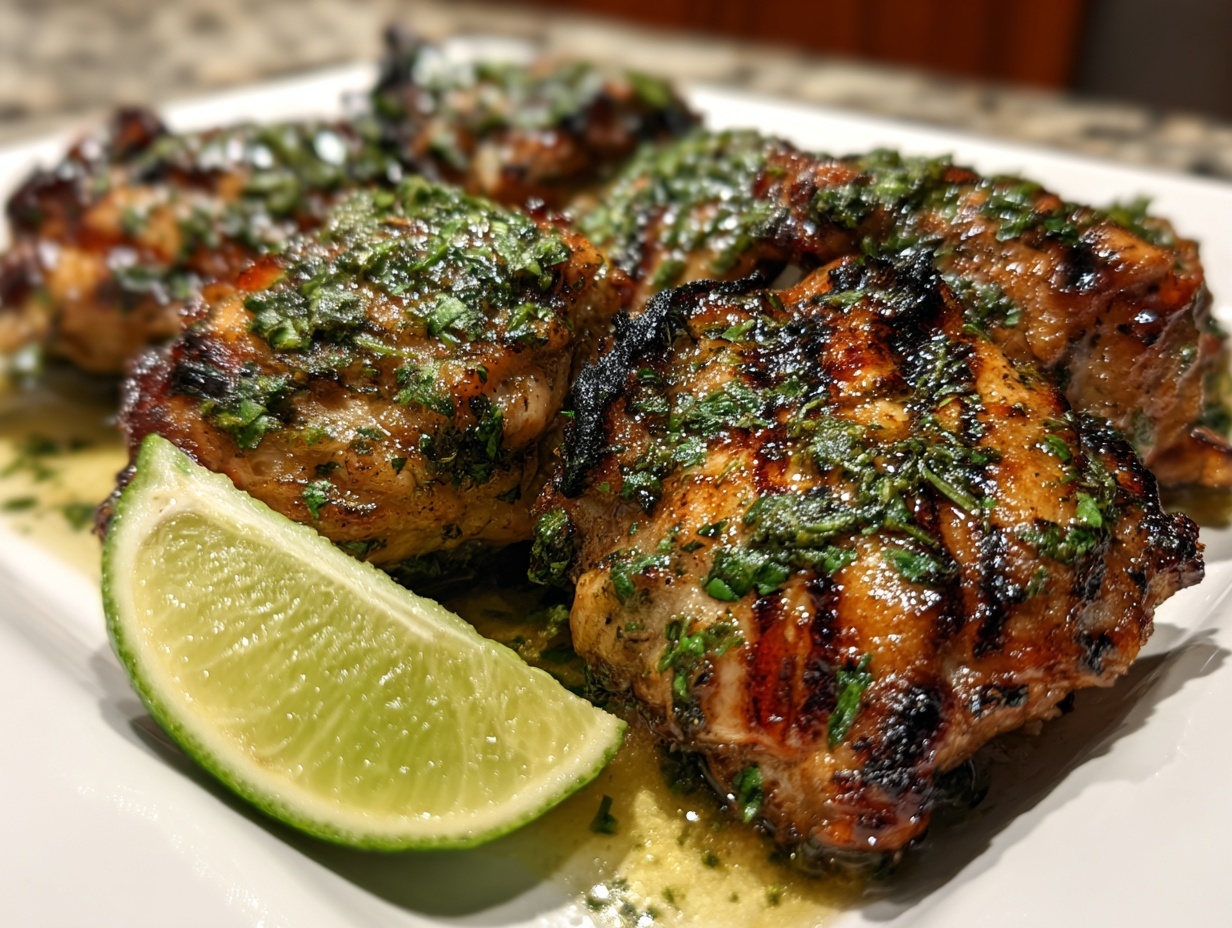
When serving immediately, presentation really makes a difference. You want that vibrant color and fresh pop of green on top to contrast with the deep amber sauce. Don’t forget the final garnishes—they aren’t just for looks; they bring the whole dish into focus!
Presentation Suggestions
Serve this piping hot over a generous bed of fluffy jasmine rice; the rice is the perfect carrier for all that glorious sauce. Spoon extra sauce over the top of the chicken pieces before you garnish. You absolutely need the fresh elements at the end: sprinkle on the remaining chopped cilantro and green onions. Finally, set lime wedges right on the side of the plate. A good squeeze of fresh lime juice right before eating is non-negotiable—that acid brightens every single flavor in the dish!
| Storage Item | Method | Reheating Tip |
|---|---|---|
| Leftovers | Store chicken and rice separately in airtight containers. | Reheat gently on the stovetop with a splash of water or chicken broth to refresh the sauce. Microwave is okay in a pinch, but stir halfway through. |
| Fresh Cilantro/Onions | Store separately in a baggie or container to keep them crisp. | Always add fresh garnishes *after* reheating for the best texture. |
Frequently Asked Questions About Vietnamese Ginger Chicken
I know when you try a new recipe, especially one involving Asian pantry staples, you always have a few questions floating around. Don’t worry, I’ve answered the most common ones I get when people try my quick Vietnamese ginger chicken recipe for the first time. These tips should help you skip any hiccups!
Can I Use Chicken Breast Instead of Thighs?
Yes, you certainly can, but you must adjust your timing! Chicken breast cooks faster and is much leaner. Sear it just like the recipe says, but when you return it to the sauce in step 6, you only need to simmer it for about 5 to 7 minutes until it hits 165°F. Any longer, and those beautiful pieces will turn dry and tough. Thighs are my preference for that cozy, melt-in-your-mouth texture, though!
What If I Do Not Have Fresh Lemongrass?
Fresh lemongrass is really the star here, giving that unmistakable fragrance, so I highly recommend finding it! If you absolutely cannot find it, you can substitute about 1 ½ teaspoons of lemongrass paste, which is often sold in tubes near the ginger and garlic. If you only have dried lemongrass, use about ½ teaspoon mixed with a tiny bit more water to help it rehydrate during the cooking process, but know the flavor won’t be quite as bright.
Q3. How can I make this dish richer or less salty?
If you taste it at the very end and it seems too salty, don’t panic! You can easily fix that by stirring in 1 to 2 teaspoons of plain water or a tiny splash of rice vinegar to balance the saltiness of the fish sauce. If you want it richer, a small pat of butter whisked in at the very end (off the heat) adds a beautiful sheen and mouthfeel.
Q4. How important is the cornstarch coating?
It’s crucial for texture! It does two things: it helps dry the surface of the chicken so it browns nicely during the sear, and it acts as a natural thickener for your sauce when you return the chicken to the pan later. Don’t skip it!
Sharing Your Experience Making This Vietnamese Ginger Chicken
I really hope this recipe brings some easy, bold flavor into your weeknight rotation! I can’t wait to hear how it turned out for you. Did the lemongrass shine through? Did you manage to get that perfect caramel color? Please leave a comment below telling me how it went and give the recipe a star rating. Happy cooking!
Tips for Achieving Restaurant-Quality Vietnamese Ginger Chicken
It’s those little details that separate a good home-cooked meal from something you’d happily pay for at a restaurant, right? When I first started making this, I had a few sticky situations with the sauce or dry chicken, but after testing this recipe endlessly, I’ve got the foolproof tricks down. The key is respecting the process, especially the searing and the caramelizing. Don’t rush the browning stages; that color equals deep flavor, which we can’t get from just simmering everything at once.
Also, always use the liquid ingredients listed, especially the fish sauce and vinegar, at the very end. You don’t want the vinegar evaporating too early when you’re trying to build the caramel. A little patience during the simmer phase ensures that the chicken absorbs all that amazing flavor without drying out.
Selecting the Right Chicken Cut
I cannot stress this enough: use the boneless, skinless chicken thighs! Chicken breast is leaner, and when you sear it quickly and then simmer it for 10 minutes, it tends to dry out and get stringy. Thigh meat has a little more fat content, which keeps it incredibly moist and tender, even after it hits that 165°F safety mark. Plus, the thighs caramelize beautifully on the outside, giving you that perfect textural contrast.
Managing the Chili Heat Level
That little bit of red chili adds such a wonderful warmth to the background, but we all have different spice tolerances! If you want the flavor of the chili without the fire, the trick is all in the seeds. When you slice your chili, if you see those white ribs and seeds, scoop them all out before slicing the red flesh thinly. That’s where most of the capsaicin lives. If you like it really spicy, leave half the seeds in, but for a cozy dinner, seeds out is the way to go!
Serving and Storing Your Flavorful Vietnamese Ginger Chicken
Once you’ve mastered making this incredibly fragrant Vietnamese ginger chicken, you’ll want to know how to show it off and how to save it for lunch the next day. Trust me, the leftovers are almost better because the sauce has more time to soak into the chicken overnight!
When serving immediately, presentation really makes a difference. You want that vibrant color and fresh pop of green on top to contrast with the deep amber sauce. Don’t forget the final garnishes—they aren’t just for looks; they bring the whole dish into focus!
Presentation Suggestions
Serve this piping hot over a generous bed of fluffy jasmine rice; the rice is the perfect carrier for all that glorious sauce. Spoon extra sauce over the top of the chicken pieces before you garnish. You absolutely need the fresh elements at the end: sprinkle on the remaining chopped cilantro and green onions. Finally, set lime wedges right on the side of the plate. A good squeeze of fresh lime juice right before eating is non-negotiable—that acid brightens every single flavor in the dish!
| Storage Item | Method | Reheating Tip |
|---|---|---|
| Leftovers | Store chicken and rice separately in airtight containers. | Reheat gently on the stovetop with a splash of water or chicken broth to refresh the sauce. Microwave is okay in a pinch, but stir halfway through. |
| Fresh Cilantro/Onions | Store separately in a baggie or container to keep them crisp. | Always add fresh garnishes *after* reheating for the best texture. |
Frequently Asked Questions About Vietnamese Ginger Chicken
I know when you try a new recipe, especially one involving Asian pantry staples, you always have a few questions floating around. Don’t worry, I’ve answered the most common ones I get when people try my quick Vietnamese ginger chicken recipe for the first time. These tips should help you skip any hiccups!
Can I Use Chicken Breast Instead of Thighs?
Yes, you certainly can, but you must adjust your timing! Chicken breast cooks faster and is much leaner. Sear it just like the recipe says, but when you return it to the sauce in step 6, you only need to simmer it for about 5 to 7 minutes until it hits 165°F. Any longer, and those beautiful pieces will turn dry and tough. Thighs are my preference for that cozy, melt-in-your-mouth texture, though!
What If I Do Not Have Fresh Lemongrass?
Fresh lemongrass is really the star here, giving that unmistakable fragrance, so I highly recommend finding it! If you absolutely cannot find it, you can substitute about 1 ½ teaspoons of lemongrass paste, which is often sold in tubes near the ginger and garlic. If you only have dried lemongrass, use about ½ teaspoon mixed with a tiny bit more water to help it rehydrate during the cooking process, but know the flavor won’t be quite as bright.
Q3. How can I make this dish richer or less salty?
If you taste it at the very end and it seems too salty, don’t panic! You can easily fix that by stirring in 1 to 2 teaspoons of plain water or a tiny splash of rice vinegar to balance the saltiness of the fish sauce. If you want it richer, a small pat of butter whisked in at the very end (off the heat) adds a beautiful sheen and mouthfeel.
Q4. How important is the cornstarch coating?
It’s crucial for texture! It does two things: it helps dry the surface of the chicken so it browns nicely during the sear, and it acts as a natural thickener for your sauce when you return the chicken to the pan later. Don’t skip it!
Sharing Your Experience Making This Vietnamese Ginger Chicken
I really hope this recipe brings some easy, bold flavor into your weeknight rotation! I can’t wait to hear how it turned out for you. Did the lemongrass shine through? Did you manage to get that perfect caramel color? Please leave a comment below telling me how it went and give the recipe a star rating. Happy cooking!
Print
Amazing 4-Ingredient Vietnamese ginger chicken
- Total Time: 35 minutes
- Yield: 4 servings 1x
- Diet: Low Fat
Description
Make fragrant Vietnamese ginger chicken with lemongrass in under 40 minutes. Tender caramelized chicken, fish sauce, and chili create a bold, cozy skillet dinner.
Ingredients
- 1 ½ pounds boneless skinless chicken thighs cut into 1-inch pieces
- 1 teaspoon kosher salt
- ½ teaspoon black pepper
- 1 tablespoon cornstarch
- 2 tablespoons neutral oil divided
- 3 stalks lemongrass white parts only, finely minced
- 3-inch piece fresh ginger peeled and cut into thin matchsticks about ¼ cup
- 4 cloves garlic finely minced
- 1 small shallot finely minced
- 1 small red chili thinly sliced, seeds removed for less heat
- 3 tablespoons light brown sugar packed
- ¼ cup water
- 3 tablespoons fish sauce
- 1 tablespoon soy sauce
- 1 teaspoon rice vinegar
- 2 green onions thinly sliced
- Fresh cilantro leaves roughly chopped, for serving
- Cooked jasmine rice for serving
- Lime wedges for serving
Instructions
- Pat the chicken dry, then toss with salt, pepper, and cornstarch until evenly coated.
- Heat 1 tablespoon oil in a large skillet over medium-high heat, then sear the chicken in an even layer 3 to 4 minutes per side until lightly browned but not fully cooked; transfer to a plate.
- Add the remaining 1 tablespoon oil to the empty skillet, then add lemongrass and cook 2 to 3 minutes over medium heat until softened and fragrant.
- Stir in ginger, garlic, shallot, and chili, and sauté 1 to 2 minutes until aromatic and just starting to turn golden.
- Sprinkle the brown sugar evenly over the aromatics, add the water, and cook 2 to 3 minutes, stirring, until the sugar dissolves and the mixture turns a deep amber caramel.
- Stir in fish sauce, soy sauce, and rice vinegar, then return the chicken and any collected juices to the pan, turning to coat in the sauce.
- Reduce the heat to medium-low and simmer 8 to 10 minutes, stirring occasionally, until the chicken is cooked through, the sauce is glossy and thickened, and the chicken reaches 165°F in the center.
- Turn off the heat, stir in most of the green onions and cilantro, and taste, adjusting with a splash more fish sauce or water as needed for balance.
- Serve the ginger lemongrass chicken over hot jasmine rice, spooning extra sauce on top, and garnish with remaining green onions, cilantro, and lime wedges.
Notes
- For less heat, make sure you remove all seeds from the red chili.
- Use chicken thighs for the best tender and moist results.
- Internal temperature must reach 165°F (74°C) for safe consumption.
- Prep Time: 15 minutes
- Cook Time: 20 minutes
- Category: Main Course
- Method: Skillet
- Cuisine: Vietnamese
Nutrition
- Serving Size: 1 serving
- Calories: 380
- Sugar: Estimate not provided
- Sodium: Estimate not provided
- Fat: 16 g
- Saturated Fat: Estimate not provided
- Unsaturated Fat: Estimate not provided
- Trans Fat: Estimate not provided
- Carbohydrates: 26 g
- Fiber: Estimate not provided
- Protein: 30 g
- Cholesterol: Estimate not provided