 Skip to content
Hey there, fellow food lovers! I’m Anna, and if there’s one thing I’ve discovered in my many years of kitchen adventures, it’s that a perfectly roasted chicken can turn any ordinary day into something special. I’m all about making that happen for you, sharing simple, joyful recipes that bring deliciousness to your table without the fuss. And today, oh boy, do I have a treat for you! We’re diving headfirst into the glorious world of Spatchcocked Roast Chicken. Trust me, this method is a game-changer for getting that impossibly crispy skin and unbelievably juicy meat every single time. It’s a technique I’ve tinkered with endlessly, and I’m so excited to share my perfected version with you!
Table Of content
Why You’ll Love This Spatchcocked Roast Chicken
Seriously, get ready to fall in love! This spatchcocked chicken isn’t just a meal; it’s an experience. Here’s why it’s going to become your new go-to:
- Super Fast Cooking: Because we flatten the chicken, it cooks way faster than a traditional roast. We’re talking dinner on the table in about 45 minutes!
- Juicy, Juicy Meat: The even cooking means no more dry breast meat and undercooked thighs. Every bite is incredibly tender and moist.
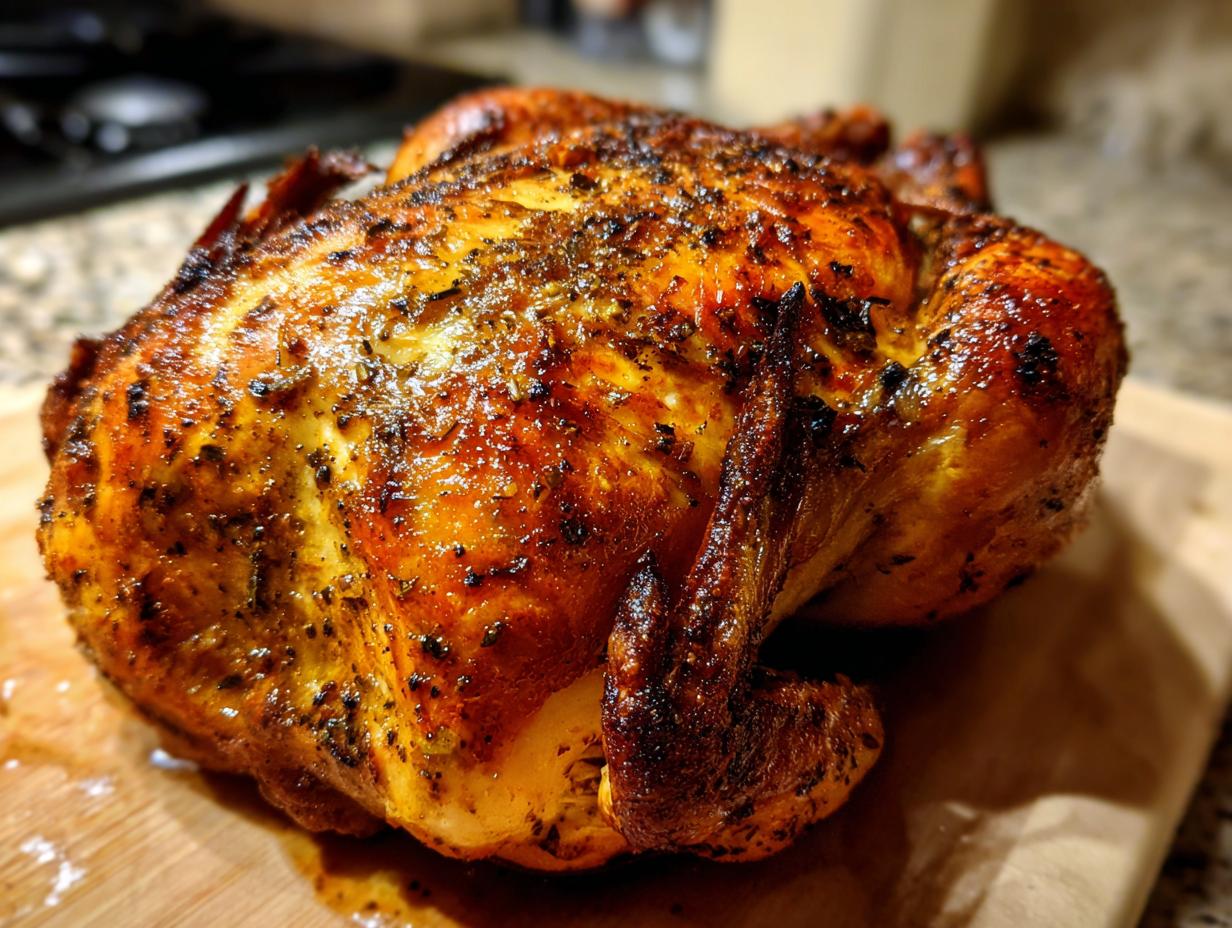
- Crispy Skin Dreams: This is the holy grail! The method ensures the skin gets beautifully golden brown and wonderfully crisp. You’ll be fighting over the crispy bits!
- Impressive Presentation: It looks so elegant on the plate, but don’t be fooled – it’s surprisingly easy to pull off, even on a busy weeknight.
- Effortless Prep: Once you get the hang of spatchcocking (which is easier than it sounds!), the rest is a breeze.
Essential Spatchcocked Roast Chicken Ingredients
Alright, let’s gather our goodies! This recipe is pretty straightforward, relying on good ingredients to shine. Here’s what you’ll need to create that magic:
| Ingredient | Quantity | Preparation |
|---|---|---|
| Chicken | 1 large (about 4-5 pounds / 1.8-2.3 kg) | Whole, for spatchcocking |
| Fresh Herbs (optional) | 2 teaspoons (10 g) | Chopped: parsley, thyme, rosemary, oregano, marjoram, savory, or a mix |
| Olive Oil (or neutral oil) | 2 tablespoons (30 ml), divided | Light olive oil, canola, or vegetable oil |
| Kosher Salt | 1 tablespoon (15 g) | For seasoning |
| Black Pepper | 1/2 teaspoon | Freshly ground |
| Baking Powder (optional) | 1 teaspoon (5 g) | Aluminum-free is best! |
| Onion | 1 medium | Roughly chopped (about 1 cup) |
| Carrot | 1 medium | Peeled and roughly chopped (about 1/2 cup) |
| Celery | 1 medium rib | Roughly chopped (about 1/2 cup) |
| Bay Leaf | 1 | Whole |
| Water | 1 cup (240 ml) | For the jus |
| Soy Sauce | 1 teaspoon (5 ml) | For the jus |
| Unsalted Butter | 3 tablespoons (45 g) | For the jus |
| Lemon Juice | 2 teaspoons (10 ml) | Freshly squeezed |
Ingredient Notes and Substitutions
Let’s talk about a couple of these ingredients, because they really make a difference! That little bit of baking powder might seem weird in a savory dish, but trust me, it’s a secret weapon for super crispy chicken skin. It helps raise the pH on the skin, making it easier to brown beautifully. Just make sure you’re using aluminum-free so you don’t get any weird metallic taste. If you can’t find it or prefer not to use it, no worries at all – the chicken will still be amazing, maybe just a *tad* less shatteringly crisp.
As for the herbs, feel free to play around! If you don’t have all those listed, just grab your favorites. A mix of thyme and rosemary is fantastic, or even just a good pinch of dried Italian seasoning if fresh isn’t handy. For the oil, any neutral oil like canola or even vegetable oil works perfectly fine if you’re out of olive oil. The goal is just to help the seasonings stick and get that skin golden!
How to Prepare Your Spatchcocked Roast Chicken
Alright, let’s get this bird ready for its close-up! This part is where the magic really starts to happen, transforming a regular chicken into a crispy, juicy masterpiece. Don’t be intimidated by “spatchcocking” – it’s way easier than it sounds, and I’ll walk you through every step.
Spatchcocking the Chicken: A Visual Guide
First things first, we need to flatten our chicken. Grab some sturdy kitchen shears – these are your best friends for this job. Place the chicken breast-side down on your cutting board. You’re looking for the backbone running down the middle. Carefully cut along *one side* of the backbone, all the way from the tail end to the neck. Then, do the same on the *other side* of the backbone. You can discard the backbone or save it for making stock later (waste not, want not!). Now, flip the chicken over, skin-side up. Gently press down on the breastbone with the heel of your hand. You might hear a little crackle – that’s just the chicken flattening out. Ta-da! It should lay nice and flat now, ready for seasoning.

Seasoning for Maximum Flavor
This is where we build all that incredible flavor! If you’re dry brining (highly recommended for the crispiest skin!), take about 1 tablespoon of kosher salt, a good pinch of black pepper, and that optional teaspoon of baking powder. Give it a good mix in a little bowl. Now, gently get your fingers under the chicken skin, starting from the neck and working your way down towards the thighs. Be super careful not to tear the skin – we want that to stay intact for maximum crispiness! If you’re using fresh herbs, tuck them right under there, spreading them over the breast and thigh meat. Then, sprinkle that salt mixture all over the chicken skin and inside the cavity. If you’re dry brining, pop it uncovered into the fridge for at least a few hours, or even overnight! This really helps dry out the skin. If you’re cooking it right away, no sweat, just proceed to the next step.
Once your chicken is seasoned (and maybe dry-brined!), it’s time to get it ready for the oven. Drizzle the skin with the remaining tablespoon of olive oil and rub it all over. This helps the skin get beautifully golden and crisp. Make sure your oven is preheated to a nice hot 450°F (230°C) on the upper-middle rack. Place the chicken on a wire rack set inside a foil-lined baking sheet. Position it so the breasts are in the center of the pan. Now, let it roast! Keep an eye on it with a thermometer. You’re looking for the thickest part of the breast meat, near the bone, to hit about 150°F (66°C), and the joint between the thigh and the body should be at least 175°F (80°C). This usually takes around 45 minutes, but ovens can be quirky, so trust your thermometer!
Crafting the Delicious Pan Jus
While the chicken is doing its thing in the oven, let’s whip up a quick, flavorful jus using that backbone we set aside. It’s so easy and adds a professional touch to your meal! Grab a small saucepan and heat the remaining tablespoon of olive oil over high heat until it’s nice and shimmery. Toss in the chicken backbone and let it get nice and brown, stirring it around for about 3 minutes. This really builds up that deep chicken flavor. Then, add your chopped onion, carrot, and celery. Stir them around until they start to get a little color, maybe another 3 minutes. Toss in the bay leaf, then pour in the cup of water. Scrape up any browned bits stuck to the bottom of the pan – that’s pure flavor gold! Let this simmer gently for about 20 minutes to let all those yummy flavors meld.
Once it’s simmered, strain out all the solids and pour the liquid back into the pan. Now, we’re going to reduce it down. Let it boil over medium-high heat until you’re left with about 1/3 cup of concentrated liquid. This usually takes around 7 minutes. Take it off the heat and whisk in the soy sauce, the lovely butter, and that splash of fresh lemon juice. Give it a little taste and add salt and pepper if you think it needs it. This simple sauce is going to be the perfect finishing touch!
Tips for Achieving Perfect Spatchcocked Roast Chicken
You’ve got this! A few little tricks will ensure your spatchcocked roast chicken is an absolute triumph every single time. It’s all about paying attention to a few key details:
- Dry is Key: Seriously, pat that chicken super dry with paper towels before you even think about seasoning. If you’re dry brining, leaving it uncovered in the fridge overnight is the ultimate way to get that skin bone-dry and ready to crisp up.
- Trust Your Thermometer: Ovens can be so finicky! Don’t guess when your chicken is done. Use an instant-read thermometer to check the thickest part of the breast (aim for 150°F/66°C) and the thigh joint (at least 175°F/80°C). It makes all the difference.
- Hot Oven, Happy Chicken: That high heat at the beginning is crucial for getting that skin golden and crackly fast. Don’t be tempted to turn it down too soon!
- Rest is Best: Once it’s out of the oven, let that beautiful chicken rest for at least 5 minutes. Tent it loosely with foil. This allows the juices to redistribute throughout the meat, ensuring every slice is moist and tender. Don’t skip this step – it’s vital!
Frequently Asked Questions about Spatchcocked Roast Chicken
Got questions? I’ve got answers! Here are some things people often ask about making this delicious spatchcocked roast chicken:
How long does it take to spatchcock a chicken? Honestly, the actual spatchcocking part is super quick – maybe 5 minutes tops once you get the hang of it! Cutting out the backbone and flattening the bird is the main step. Then you’ve got the seasoning and roasting time, which is about 45 minutes.
Can I use different herbs for this Spatchcocked Roast Chicken? Absolutely! That’s the beauty of this recipe. While I love a mix of parsley, thyme, and rosemary, feel free to use whatever you have on hand or love the most. A simple dried Italian blend works wonders too. Just tuck them under the skin for the best flavor infusion!
What is the best temperature for roasting a Spatchcocked Roast Chicken? We like to start hot and fast with this one! Preheating your oven to 450°F (230°C) is key for getting that skin super crispy. You’ll roast it at that temperature until the thickest part of the breast reaches 150°F (66°C) and the thigh joint is at least 175°F (80°C).
Can I prepare the chicken ahead of time? Yes, you totally can! The dry brining step is perfect for this. You can season your chicken, tuck in the herbs if you’re using them, and then let it sit uncovered in the fridge for up to 24 hours. This not only infuses flavor but also helps dry out the skin for maximum crispiness. Just bring it out about 15 minutes before roasting!
Storing and Reheating Your Spatchcocked Roast Chicken
Leftover spatchcocked roast chicken is a total win! To keep it tasting its best, let the cooked chicken cool completely before storing. Then, wrap it tightly in plastic wrap or tuck it into an airtight container. You can store it in the refrigerator for about 3 to 4 days. When you’re ready to reheat, you’ve got a couple of great options to keep that chicken juicy and delicious:
| Method | Temperature/Time | Notes |
|---|---|---|
| Oven/Toaster Oven | 325°F (160°C) for 10-15 minutes | Tent loosely with foil to prevent drying out. |
| Microwave | Medium power for 1-2 minutes | Reheat in short bursts, checking for warmth. Best for smaller portions. |
| Skillet | Medium-low heat with a splash of broth or water | Helps rehydrate the meat and keep it moist. |
Estimated Nutritional Information for Spatchcocked Roast Chicken
Just a heads-up, these numbers are estimates since every chicken is a little different and seasoning amounts can vary! This info is based on about 1/6th of the chicken, including some of that amazing jus.
| Nutrient | Amount |
|---|---|
| Serving Size | 1/6th chicken |
| Calories | approx. 500 |
| Fat | approx. 30g |
| Saturated Fat | approx. 10g |
| Unsaturated Fat | approx. 20g |
| Trans Fat | 0g |
| Cholesterol | approx. 150mg |
| Sodium | approx. 800mg (will vary based on added salt) |
| Carbohydrates | approx. 3g |
| Fiber | approx. 1g |
| Sugar | approx. 2g |
| Protein | approx. 50g |

Amazing Spatchcocked Roast Chicken in 45 Minutes
- Total Time: 1 hour 5 minutes
- Yield: 6 servings 1x
- Diet: Halal
Description
This Spatchcocked Roast Chicken recipe delivers a crispy, golden-brown skin and incredibly juicy meat. Spatchcocking, or butterflying, the chicken allows for more even cooking and a faster roast. This method is perfect for weeknight dinners or special occasions, resulting in a delicious and impressive centerpiece.
Ingredients
- 1 large chicken, about 4 to 5 pounds (1.8 to 2.3 kg)
- 2 teaspoons (10 g) chopped fresh parsley, thyme, rosemary, oregano, marjoram, savory, or a mix (optional)
- 2 tablespoons (30 ml) light olive oil or other neutral-flavored oil, such as canola or vegetable, divided
- Kosher salt and freshly ground black pepper
- 1 teaspoon (5 g) baking powder (optional)
- 1 medium onion, roughly chopped (about 1 cup)
- 1 medium carrot, peeled and roughly chopped (about 1/2 cup)
- 1 medium rib celery, roughly chopped (about 1/2 cup)
- 1 bay leaf
- 1 cup (240 ml) water
- 1 teaspoon (5 ml) soy sauce
- 3 tablespoons (45 g) unsalted butter
- 2 teaspoons (10 ml) juice from 1 lemon
Instructions
- Place oven rack in upper-middle position and preheat oven to 450°F (230°C). Using sharp kitchen shears, remove backbone from chicken and cut spine into 5 to 6 one-inch-long pieces. Set backbone aside. Flatten chicken by placing skin side up on a cutting board and applying firm pressure to breastbone. Transfer to a wire rack set in a foil-lined rimmed baking sheet. Position chicken so that breasts are aligned with center of baking sheet and legs are close to edge.
- If using herbs: using your fingers and starting from the neck end and working your way down towards the legs, gently separate chicken skin from the breast and thigh meat; be careful not to tear the skin. Carefully push the herbs under the skin, distributing them as evenly as possible all over the breast and thigh muscle.
- Combine 1 tablespoon (15g) kosher salt, 1/2 teaspoon ground black pepper, and 1 teaspoon (5g) baking powder (if using) in a small bowl. Sprinkle all over chicken skin and cavity sides, then return to skin-up position. If dry brining, transfer chicken to refrigerator and let sit, uncovered, for at least 3 and up to 24 hours; otherwise proceed with cooking right away.
- Drizzle chicken skin with 1 tablespoon (15ml) oil, rubbing to distribute evenly. Roast chicken until thickest part of breast close to bone registers 150°F (66°C) on an instant-read thermometer and joint between thighs and body registers at least 175°F (80°C), about 45 minutes.
- Meanwhile, heat remaining 1 tablespoon (15ml) oil in a small saucepan over high heat until shimmering. Add chicken backbone and cook, stirring frequently, until well browned, about 3 minutes. Add onion, carrot, and celery and cook, stirring frequently, until beginning to brown, about 3 minutes. Add bay leaf and 1 cup (240ml) water, using a wooden spoon to scrape up any browned bits from bottom of pan. Reduce heat to maintain simmer and cook for 20 minutes.
- Strain out solids and return liquid to pan. Boil over medium-high heat until approximately 1/3 cup (80ml) remains, about 7 minutes. Whisk in soy sauce, butter, and lemon juice off heat. Season to taste with salt and pepper.
- Remove chicken from oven, transfer to cutting board, tent loosely with foil, and allow to rest 5 minutes before carving. Serve with hot jus.
Notes
- For extra crispy skin, ensure the chicken is dry before seasoning and roasting. If dry brining, leaving the chicken uncovered in the refrigerator helps dry out the skin.
- Baking powder is optional but helps create a crispier skin by raising the pH of the skin’s surface, making it easier to brown. Use aluminum-free baking powder to avoid a metallic taste.
- Adjust salt and pepper to your preference.
- Prep Time: 20 minutes
- Cook Time: 45 minutes
- Category: Main Course
- Method: Roasting
- Cuisine: American
Nutrition
- Serving Size: 1/6th chicken
- Calories: approx. 500
- Sugar: approx. 2g
- Sodium: approx. 800mg (will vary based on added salt)
- Fat: approx. 30g
- Saturated Fat: approx. 10g
- Unsaturated Fat: approx. 20g
- Trans Fat: 0g
- Carbohydrates: approx. 3g
- Fiber: approx. 1g
- Protein: approx. 50g
- Cholesterol: approx. 150mg


